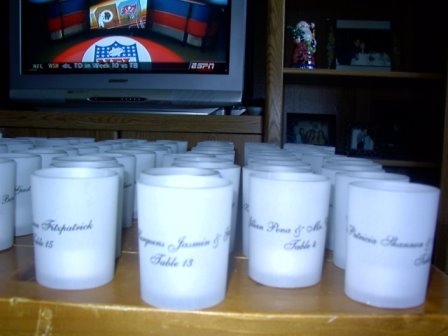
If you made your own, can I see them? I want to see if there is a difference between DIY and those done by someone.
hmpena
Posted:
Member since
Re: DIY Votive Plaecards....
Here are mine:
Mandyin2007
Posted:
Member since
Re: DIY Votive Plaecards....
They look awesome!!!
hmpena
Posted:
Member since
Re: DIY Votive Plaecards....
Posted by FutureMrsLoRe
They look awesome!!!
Thank you!
cjb88
Posted:
Member since
Re: DIY Votive Plaecards....
ours:
Backinneyork
Posted:
Member since
Re: DIY Votive Plaecards....
I thought they were pretty easy to make a lot less expensive if you do them yourself!
CLMon7906
Posted:
Member since
Re: DIY Votive Plaecards....
bump
AlmostMrsKelly
Posted:
Member since
Re: DIY Votive Plaecards....
how do you make them?
melissaandsean
Posted:
Member since
Re: DIY Votive Plaecards....
melissaandsean
Posted:
Member since
Re: DIY Votive Plaecards....
instructions from another thread:
Votive Placecard Instructions
You will need: Plain glass votive holders; light -medium weight transparent vellum; access to a Laser printer, a good scissors; double sided tape; tealights
Step One: Measure your votive holders to determine the approximate height and length around. Using these measurements, make a template of the shape of your label. Note that even the most plain votive holders will have a slight curvature, so expect the template to be in an arch shape.
Step Two: Using the approximate measurements, set up your MS Word (or any other graphic program that is useful for printing text) document to space your guests names and table numbers the right distance. In my case, I got 3 to a page with room to spare.
Step Three: Print out your document. Use the template you made in step one to cut the right shape out of the larger sheets of vellum. Set the labels aside.
Step Four: (get a friend to help if at all possible) Set up a big workstation with all your votives, labels, double sided tape and scissors. Wrap one label around the votive and trim accordingly. When the label is lined up correctly, it will lay relatively flat. Apply the double sided tape and put aside. Having all of the candles in front of you will allow you to keep a consistent appearance of the candles and give you a preview of what they will look like all lined up at the wedding.
Tips: Have candles lit no more than 30 minutes before your guests come to pick them up to ensure they are all still burning when the last guest leaves your reception.
Tip: Using tealights in place of votive candles will result in the candles getting warm but not too hot to touch. However, there is melted wax inside the votive so better to keep away from children.
My TIP: use a piece of cardboard as a 'template' so that you can cut the vellum paper more easily. I also used a mixture of hot-glue, because I couldn't get the vellum-tape to work and it does not work. DO NOT USE HOT GLUE LOL It melts when hot (DUH!!)