
My DIY Table Numbers with Epics & directions - UPDATED directions at the end!
I posted this on '07, but figured I should post it here too in case anyone wanted to know how I did them.
These are the first samples of my DIY Table Numbers. I am using 12 different e-pics and each one will have a different number (right now they all say 'Table 1' because I have to decide the order).
UPDATED: THESE ARE THE FINAL TABLE NUMBERS.

For those of you who asked how I did it, here's my semi-complicated way... for those graphics experts out there, maybe you can suggest an easier way???
Ok, I opened Powerpoint.
- New document
- File, Page Setup
- Changed the page size to 20 x 28 inches (**this is 4 times the 5x7 size they will actually be printed as - this is so that the quality remains as high as possible when I save it as a jpg file**)
- Click OK
- Then Insert Image you want to use
- Double click image (brings up Format Picture window)
- In the 'Size' tab, changed the height to 20 inches
*VERY IMPORTANT: Make sure the 'Lock Aspect Ratio' box IS CHECKED*
- Now the picture fits perfectly up and down, but may be too big horizontally.
- Crop the left or right (or both) side until it's 28 inches.
- Now the image is the same size as your Page Setup.
To make the image lighter:
- Double click image
(Format Picture window opens)
- In the 'Picture' tab, click on the arrow for 'Color'
- Choose 'Washout'
- Click OK
- IF the image is too light, go back into Format Picture and INCREASE the Contrast by 10 and DECREASE the brightness by 10.
To add text:
- Insert WordArt
- Play with fonts, colors, and size to achieve the look you want for the wording.
ETA: Ok so I forgot to add the last step - how to save the file as a picture.
When you are done with making the file (and as you are working on it), save your file.
Once you're finished and happy with the way the picture looks, you need to save it as a jpg file. To do this, go to File, Save As, and in the 'File Type' change it to 'JPG' and save it again as a jpg. It's going to ask you to save all slides or just the current slide - if you click to save all files, it will save each slide that you have in the file as a jpg - each file will be automatically saved in a new folder.
So now you have the files saved as individual jpg files. What I plan to do is to upload the jpg files to Kodak Gallery or Shutterfly and to order 5x7 prints of each - that way I'll have actual pictures and don't have to worry about buying photopaper and printing them myself. But I'm sure you could do that if you want.
HTH!!!
ETA: Here's a picture of one of my actual table numbers from my wedding:
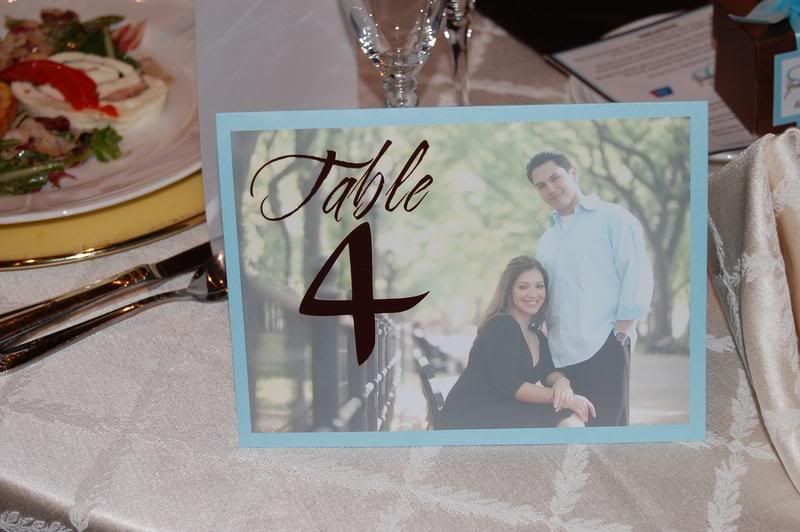
I opted not to put them in frames at the end because I wanted to use my blue color as a border and couldn't find any frames in the right tone. I ended up making 'tent' cards out of cardstock (same one I used for my placecards, programs, etc) and glued the pics onto one side of the tent card.
Most of them were taken home by guests!!!
These are the first samples of my DIY Table Numbers. I am using 12 different e-pics and each one will have a different number (right now they all say 'Table 1' because I have to decide the order).
UPDATED: THESE ARE THE FINAL TABLE NUMBERS.
For those of you who asked how I did it, here's my semi-complicated way... for those graphics experts out there, maybe you can suggest an easier way???
Ok, I opened Powerpoint.
- New document
- File, Page Setup
- Changed the page size to 20 x 28 inches (**this is 4 times the 5x7 size they will actually be printed as - this is so that the quality remains as high as possible when I save it as a jpg file**)
- Click OK
- Then Insert Image you want to use
- Double click image (brings up Format Picture window)
- In the 'Size' tab, changed the height to 20 inches
*VERY IMPORTANT: Make sure the 'Lock Aspect Ratio' box IS CHECKED*
- Now the picture fits perfectly up and down, but may be too big horizontally.
- Crop the left or right (or both) side until it's 28 inches.
- Now the image is the same size as your Page Setup.
To make the image lighter:
- Double click image
(Format Picture window opens)
- In the 'Picture' tab, click on the arrow for 'Color'
- Choose 'Washout'
- Click OK
- IF the image is too light, go back into Format Picture and INCREASE the Contrast by 10 and DECREASE the brightness by 10.
To add text:
- Insert WordArt
- Play with fonts, colors, and size to achieve the look you want for the wording.
ETA: Ok so I forgot to add the last step - how to save the file as a picture.
When you are done with making the file (and as you are working on it), save your file.
Once you're finished and happy with the way the picture looks, you need to save it as a jpg file. To do this, go to File, Save As, and in the 'File Type' change it to 'JPG' and save it again as a jpg. It's going to ask you to save all slides or just the current slide - if you click to save all files, it will save each slide that you have in the file as a jpg - each file will be automatically saved in a new folder.
So now you have the files saved as individual jpg files. What I plan to do is to upload the jpg files to Kodak Gallery or Shutterfly and to order 5x7 prints of each - that way I'll have actual pictures and don't have to worry about buying photopaper and printing them myself. But I'm sure you could do that if you want.
HTH!!!
ETA: Here's a picture of one of my actual table numbers from my wedding:
I opted not to put them in frames at the end because I wanted to use my blue color as a border and couldn't find any frames in the right tone. I ended up making 'tent' cards out of cardstock (same one I used for my placecards, programs, etc) and glued the pics onto one side of the tent card.
Most of them were taken home by guests!!!

