Wedding Forums > Brides Helping Brides ™ > Almost done with our Photo Cardbox! (PICS)
Almost done with our Photo Cardbox! (PICS)
xcalystax
Posted: Jul 05, 2006 09:36 PM+

Posted: Jul 05, 2006 09:36 PM

Almost done with our Photo Cardbox! (PICS)
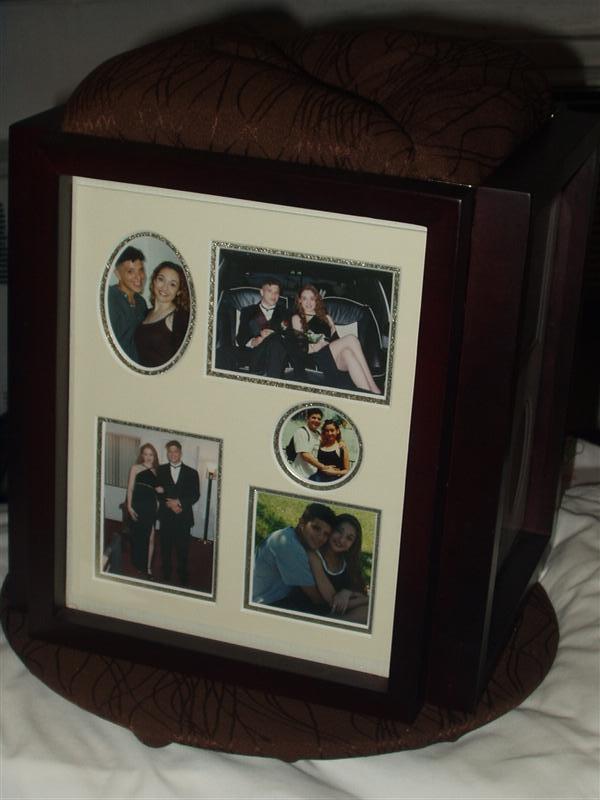
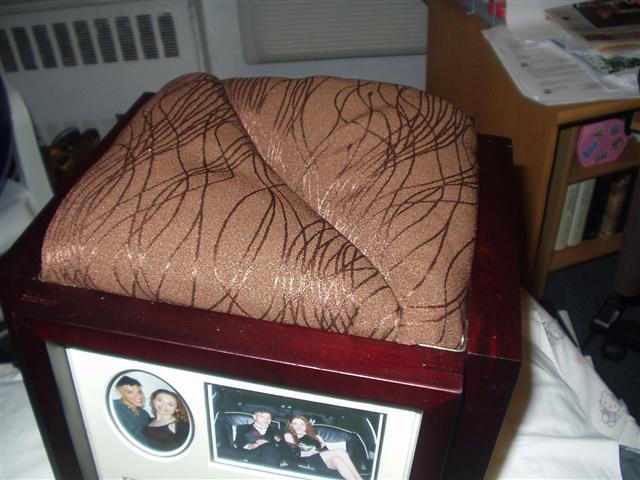
Our colors are brown with pink and ivory accents. We made the box brown and used Ivory backing for the pics. We still need to reinforce the top and add more pics but we are almost done!! If you look closely we have some of our prom pics from 9 years ago!

kittythestray
Posted: Jul 05, 2006 09:53 PM+
Posted: Jul 05, 2006 09:53 PM
Re: Almost done with our Photo Cardbox! (PICS)
Wow! it looks AMAZING!!!!!
lacey&mark
Posted: Jul 05, 2006 09:53 PM+
Posted: Jul 05, 2006 09:53 PM
Re: Almost done with our Photo Cardbox! (PICS)
oh wow! great job!
sarahradio5
Posted: Jul 05, 2006 09:55 PM+
Posted: Jul 05, 2006 09:55 PM
Re: Almost done with our Photo Cardbox! (PICS)
VERY nice! GREAT job!!
DandS
Posted: Jul 05, 2006 09:55 PM+
Posted: Jul 05, 2006 09:55 PM
Re: Almost done with our Photo Cardbox! (PICS)
Good Job, it is coming out great!
snydl40
Posted: Jul 05, 2006 09:57 PM+
Posted: Jul 05, 2006 09:57 PM
Re: Almost done with our Photo Cardbox! (PICS)
Beautiful-great job.
LT708
Posted: Jul 05, 2006 10:02 PM+
Posted: Jul 05, 2006 10:02 PM
Re: Almost done with our Photo Cardbox! (PICS)
WOW!! That is gorgeous!
cuteauburnininny
Posted: Jul 05, 2006 10:06 PM+
Posted: Jul 05, 2006 10:06 PM
Re: Almost done with our Photo Cardbox! (PICS)
looks great
xcalystax
Posted: Jul 06, 2006 11:53 AM+
Posted: Jul 06, 2006 11:53 AM
Re: Almost done with our Photo Cardbox! (PICS)
Do you guys think I should try to incorporate the pink somehow?
neener1211
Posted: Jul 06, 2006 12:02 PM+
Posted: Jul 06, 2006 12:02 PM
Re: Almost done with our Photo Cardbox! (PICS)
very cute!! if you can add pink, then do it...I'm just not sure how though....
soon2bmrsdunn
Posted: Jul 06, 2006 12:04 PM+
Posted: Jul 06, 2006 12:04 PM
Re: Almost done with our Photo Cardbox! (PICS)
WOW!!! Great job!
ewickens
Posted: Jul 06, 2006 12:06 PM+
Posted: Jul 06, 2006 12:06 PM
Re: Almost done with our Photo Cardbox! (PICS)
Looks amazing!!!!!!!!!
Linda36
Posted: Jul 06, 2006 06:08 PM+
Posted: Jul 06, 2006 06:08 PM
Re: Almost done with our Photo Cardbox! (PICS)
WOW! That looks great. Where did you get the materials and instructions on how to build it?
Mooshyboo
Posted: Jul 06, 2006 08:07 PM+
Posted: Jul 06, 2006 08:07 PM
Re: Almost done with our Photo Cardbox! (PICS)
Wow That looks AMAZING ~ can you help me with mine?
xcalystax
Posted: Jul 06, 2006 08:12 PM+
Posted: Jul 06, 2006 08:12 PM
Re: Almost done with our Photo Cardbox! (PICS)
We changed some things up but these are the directions we used.Directions for the card box:
It's actually very easy. Buy four picture frames of the same size, foam board, an exacto knife to cut the foam core, 8 L brackets (size 1 inch), some cheap but pretty fabric (we chose white), 4 very small tack nails, some strips of stick-on velcro (enough to cover the width of four sides of the frame and a lazy suszan.
1. Hold two picture frames together to form a 90 degree angle so that the frames are standing portait style. Hold an L backet up to the top corner of the angle made by the frames and use a pen or pencil and trace the holes. Repeat this with a L bracket on the bottom corner. Then, on the marks you made, drill small lead holes into the frames (so that the screw goes into the frame without cracking the frame).
2. Screw in the L brackets into the holes you just created.
3. Repeat this until all 4 frames are connected at both the top and bottom. (By the way, the most difficult thing you will encounter in the end is trying to screw in the 4th frame because you will have created a box around the space you've just been working in. You might want to use a small screwdriver here).
4. Place the box on top of the foamboard and trace the bottom of the box onto the board. Repeat this step. Cut out both boxes you just traced on the foamboard, thus creating the top and bottom for the box.
5. On one of the pieces of foamboard you just cut out, draw and cut out a slot for envelopes to go in. I suggest cutting this a little wider than your gut reaction tells you to do. There's no exact measurements to follow here, just eyeball it.
6. Take the top and bottom and cover them with the fabric. The fabric only needs to cover one side of the foamboard. We stappled the fabric to the foamboard with a regular paper stappler. Watch pressing too hard or you will punch the stables through the top of the boards and it will show through the fabric. You could also use tape, but that didnt work so well for us.
7. On the board with the slot for envelopes, carefully cut the fabric starting at one end of the slot to the other end. Then, carefully cut the fabric at the ends of the slots so that the fabric can be neatly pulled down into the slot and stappled or taped down, so that the slot is neatly covered with fabric. We actually screwed this step up a couple of times. What worked best for us was to cut the slot wide enough. If it's too thin, the fabric won't tuck back down into the slot neatly and the material constantly sticks back up. We also used batting to make the top look fluffy.
8. Take the foamboard without the slot, and lightly nail it into the bottom of the frame (with the fabric side facing down (towards the outside). You can just nail the board in at the four corners. Dont hammer too hard or you'll damage the board.
9. Place the stick on velcro on at least two opposing edges of the top of the box. Peal the other side of the vecro off so that the sticky side is exposed and press down the other foamboard with the slot (fabric side facing up). Press down lightly to make sure the vecro sticks to both the framebox and the top foamboard. Once done, carefully pull the top off so that you can reach back into the box.
10. Open the frames and insert whatever pictures you want in the frames and place it on top the lazy susan and put the top lid back on.
xcalystax
Posted: Jul 06, 2006 08:12 PM+
Posted: Jul 06, 2006 08:12 PM
Re: Almost done with our Photo Cardbox! (PICS)
One more thing...I covered the lazy susan in the same fabric as the top of the box.
ambrosbride
Posted: Jul 06, 2006 08:18 PM+
Posted: Jul 06, 2006 08:18 PM
Re: Almost done with our Photo Cardbox! (PICS)
good job
BellaEyes
Posted: Jul 06, 2006 08:21 PM+
Posted: Jul 06, 2006 08:21 PM
Re: Almost done with our Photo Cardbox! (PICS)
Very good job!


Welcome New Vendors
- The Barn At Old Bethpage Discover the charm a...

- Jack & Rose Jack & Rose Floral D...

- Tellers: An American Chophouse Celebrate Your Love ...

- Cup Of Tea Creative Unique Wedding Gifts...

- Speeches for Milestones The Big Day Has Arri...

- Long Island Bridal Expo Connecting Brides & ...

- 1 More Rep 1 More Rep: Elite Fi...

- Bellport Inn The Bellport Inn –...

- Fiddlers Dream Music Experience the Music...

- Havana Central Celebrate Your Weddi...

- Primerica Nelida Flynn Primerica Nelida Fly...

- Acetra Affairs Here at Acetra Affai...
