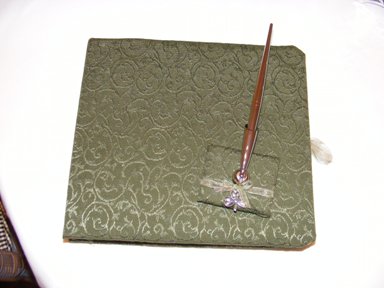
Oooo, Jessica, you did a great job!!!! Tell me how you did that!!!! Mary MOB
kbond06
Posted:
Member since
Re: My DIY Guest Book & Pen
very nice, I like how the pen has a little holder cute!
LegoBride
Posted:
Member since
Re: My DIY Guest Book & Pen
Gorgeous!
dazies1011
Posted:
Member since
Re: My DIY Guest Book & Pen
Very nice
donnasmom
Posted:
Member since
Re: My DIY Guest Book & Pen
Awww, another Irish Bride!!!! How lovely!!! You do great DIY !!!!!!!! Do you have a pic of your centerpieces? Mary MOB
Walkintomymind
Posted:
Member since
Re: My DIY Guest Book & Pen
Wow!!!! You did a great job!!!!!
mcclj74
Posted:
Member since
Re: My DIY Guest Book & Pen
i just typed the whole thing of how i did it and lost it - i will have to redo that another time - i have to eat now - so late! lol!
the pen with holder is a wilton guestbook pen that i covered with fabric too...
i will retype the directions and post them later!
mcclj74
Posted:
Member since
Re: My DIY Guest Book & Pen
Posted by donnasmom
Awww, another Irish Bride!!!! How lovely!!! You do great DIY !!!!!!!! Do you have a pic of your centerpieces? Mary MOB
thank you - i dont have them quite completed - but when i do i will post it
mcclj74
Posted:
Member since
Re: My DIY Guest Book & Pen
thanks everyone for your kind comments!
PoppedInASnap
Posted:
Member since
Re: My DIY Guest Book & Pen
Wow how did u managethat!!! awesome!
mcclj74
Posted:
Member since
Re: My DIY Guest Book & Pen
Here are the directions...I will cross-post on DIY as well
Supplies Needed:
8x8 scrapbook – any color (I prefer the post-bound kind)
Approximately 1 yard of fabric (to match your décor)
Heat-N-Bond (the no sew kind) – here is a link to what it looks like: http://www.joann.com/joann/catalog.jsp?CATID=cat483848&PRODID=prd2979&source=search
2 coordinating pieces of heavy cardstock (I prefer Bazzill)
Glue Gun
Iron & Ironing Board
Sharp Fabric Scissors
Instructions: 1) Take the scrapbook apart so that you have the front and back covers separate. 2) Trace a 1 inch circumference around the edges of the front and back covers onto the front of the Heat-N-Bond (the smooth side, not the part that is rough) ? this is so that you have an inch of extra material around the each cover 3) Iron the Heat-N-Bond onto the back side of the fabric following the directions on the Heat-N-Bond packaging. You iron it on the back side because this is the side that you will not want to be the cover of the book. 4) Cut out each piece with a sharp scissor on the lines that you traced in step 2. 5) Peel off the white part of the Heat-N-Bond. 6) Place the front cover onto the ironing board. 7) Place your fabric over the center of the front cover and iron the piece of fabric on the front cover including all of the edges. I start from the center out so that you don’t get any wrinkles or bubbles. 8) Flip the front cover so that the inside is showing. Now you should have an extra inch or so of fabric to iron onto the inside of the front cover. Iron each side from one end to the other to adhere the fabric to the back side of the front cover. 9) Repeat steps 6-8 for the back cover of the scrapbook. 10) Hot glue the card stock to the back sides of the front and back covers of the scrapbook. 11) Punch holes in whatever paper you want to use for the guest book if you are using it as a guest book. 12) Put the scrapbook back together and you have a completed project!
Note: I hot glued equal pieces of ribbon on the back side of the covers prior to putting the cardstock on the back side so that I could use them to tie the book closed.
flairforfashion
Posted:
Member since
Re: My DIY Guest Book & Pen
I love it!!!!!! The fabric pattern is really nice! Nice work.