Wedding Forums > Brides Helping Brides ™ > DIY projects- several ideas
DIY projects- several ideas
angelbear217
Posted: Nov 10, 2004 09:15 PM+

Posted: Nov 10, 2004 09:15 PM

DIY projects- several ideas
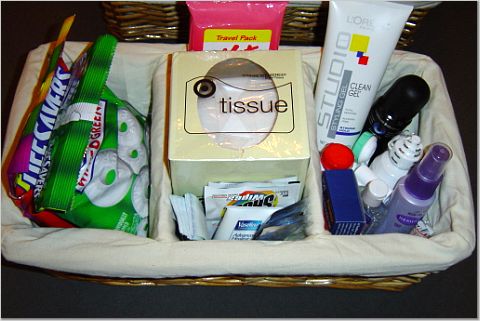
I found these saved on my computer and just wanted to share. Have fun and good luck.#1 Bathroom Baskets
Bathroom Basket Ideas
The contents
breath mints and breath strips
individually wrapped toothpicks
small Band-aids
tablet antacids like Tums
safety pins
individual packets of an OTC pain reliever like Advil or Excedrin
pocket-packs of tissues
a few matchbooks (plain, or from the venue, please)
*travel bottle of hand sanitizer
*Shout wipes or other stain-remover wipes
a small pair of scissors
combs
cough drops
gum
hair spray
gel
dental floss
lint brush
Additionally, in the ladies' basket:
a travel-sized hair spray
a few tampons and pads
a bottle of clear nail polish
hand lotion
bobby pins
a couple of emery boards
a packet of replacement earring backs
angelbear217
Posted: Nov 10, 2004 09:17 PM+
Posted: Nov 10, 2004 09:17 PM
Re: DIY projects- several ideas
#2 Paddle Fans:How to Make your own Program Paddle Fans
Written by Leigh Ann Hines Leigh Ann Hines Durham, NC
Making your own Program Paddle Fans
MATERIALS:
* 2 sheets of cardstock for each fan (one for each side)
* A handle for each fan. We used paint stirrers. I found large tongue depressors to be too small
* Paint (for the handles)
* Spray adhesive
* Scissors: get good, comfortable scissors, or you will end up with blisters on your fingers.
* Paper cutter. This is optional, but it will really make things easier.
You need to make a couple decisions: what shape you want your fan, and what you want printed on each side. Remember when deciding on a shape, that intricate shapes are difficult to cut by hand. The length of our fans (paper part only) was 7 inches. The narrowest part of our fan was 4.5”; widest part was 6.25”. This size gave us a space of 3.75” X 6.25” for printing text or graphics.
INSTRUCTIONS
1. Design the shape and size of your fan. Using a scanner (to scan in a line drawing of the shape) get the outline of the desired shape into your computer. Make sure that the very top of the shape is at the very top edge of the paper, within the program.
2. Design your program (both sides) to fit within you desired shape. You will need 2 sheets of cardstock. On the first sheet of cardstock, print the outline of the shape of the fan, and the program text or graphic.
On the second sheet, you will be printing on both sides of the cardstock. On one side, print the program text/graphic, but no outline of the fan shape. On the backside of sheet 2 (side 2), print guidelines for centering the handle. Do this by measuring the width of your handle (mine was 1 1/8” wide) and create a page in your layout with 2 straight lines that are that distance apart, and centered on the page.
3. Cut the sheets to finished length. Using a paper cutter, set the stop so that it cuts the length of the paper of sheet 1 where the bottom of the fan shape is. Then, in assembly line fashion, cut all of sheet 1 and sheet 2 to the same length.
4. Now you need to make your handles. I prefer the paint stirrers, since they are long enough to run the whole length of the fan, adding strength and support to the fan, and a large enough handle to hold onto easily. Paint stirrers vary in size and length, but are usually between 11 and 13 inches long. We painted our handles white, using spray paint. But if you don’t have a lot of outside space, you can use a paint brush and paint them the desired color. Be sure to paint the edges as well.
5. Now you should have all the parts ready and are ready to assemble the fans. I found the easiest way was to make a jig, so that I could do it like an assembly line. Basically, the jig sets everything up so you can put them together straight each time. All you need to do is take a cardboard box, and put sheet 2 in the box, with the backside up (the side with the handle guidelines). Make sure the sheet is pushed into one corner. Now, using a knife, cut a slot in the side of the box, where the handle would have to stick out when glued between the guidelines. This box is your jig!
6. Assembly. Following instructions on the can of adhesive, spray the back side of both sheets with adhesive. Place sheet 2 in the jig, with the handle guides facing up. Place handle between the lines. Be sure to position the handle so that it runs to about an eighth of an inch of the top of the fan. Place sheet 1 on top, using the sides of the box to guide you so that you lay it on straight. Press them together.
7. After the fans have dried, cut them to the desired shape by cutting along the line drawing printed on one side of the fan.

angelbear217
Posted: Nov 10, 2004 09:18 PM+
Posted: Nov 10, 2004 09:18 PM
Re: DIY projects- several ideas
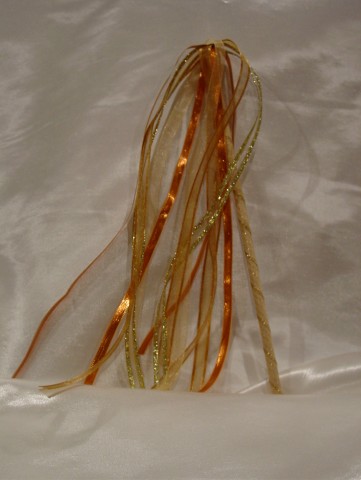
#3 Ribbon WandsRIBBON WAND DIRECTIONS
I’ve had a lot of people ask me how I made the ribbon wands, so I will do my best to explain it. It’s sort of hard to do without visuals, but I will do my best! I began by purchasing 12-inch wooden dowel rods at Michaels. They were about $1.15 for packages of 20-25. I bought silver spray paint (it’s better to buy the more expensive kind, because I tried the cheaper kind and the silver rubbed off onto my hands when I held the dowel rods). I think the spray paint I bought was around .00 and it covered around 75 wands. To spray paint them, I laid out newspaper in my garage and did them all at the same time, making sure to turn them to make sure they were completely covered.
I bought the ribbon at Michael’s, too. It was on sale for 50 cents per spool (each spool was 10 yards). It’s not the sort of ribbon you use to wrap presents, so I supposed it would be considered cloth. I bought three different colors: White, purple, and lavender. For each wand, I only used two colors, but you could use more if you wanted to. Alright, now for the assembly part (this is where it may get confusing!) I picked two colors and cut one piece from each, about 30 inches long. Once I had the two pieces of ribbon, I folded them in half so there is a loop at one end, and the other end looks like there are four ribbons. I held the loop against one end of the rod. Then I took the end of the ribbon and put it through the loop. Now the ribbon was looped into the rod. I got the knot to look nice, and then I secured it with a dab of hot glue. You can see a close-up picture of the knot, so hopefully it will make more sense. I really didn’t keep track very well of how much ribbon I went through. I suppose you could do the math to figure it out, considering each spool has 10 yards of ribbon and each piece is about 30 inches long. I hope this helped explain the process to you. Feel free to email me if you need further details, but it’s sort of hard to do in writing! The knot was the hardest part for me to figure out and it took awhile of messing around with it before I found something that worked. Other girls have done them differently. Good luck!
angelbear217
Posted: Nov 10, 2004 09:19 PM+
Posted: Nov 10, 2004 09:19 PM
Re: DIY projects- several ideas
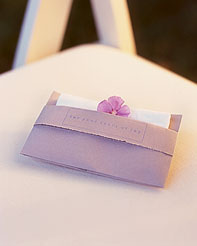
#4 Take your seat place cardsTo Make: If you are using calligraphy on the chairs, do so after the paper is cut. If you are printing on them, do so before the paper is cut. The name goes on the panel for the back, and the table number goes on the panel for the seat.
1. To form each paper chair, you will need one 11 x 2 1/2 inch strip of cardstock; you can fit 3 chairs per 8.5x11 piece of cardstock. Use a bone folder to score each strip into 4 sections; a top one that*s 4 ¼ inches long, then three equal 2 1/4inch sections.
2.Fold the strip at the top score line; the short section of the L will be the chairs back.
3. Bring the horizontal part of the strip down as shown, and fold at the next score line, forming the chair back and starting the seat.
4. Fold the strip down at the front of the seat to make the front legs. Use a glue stick or double*sided tape to secure the two layers of the chair back together. Set right side up, and trim if necessary.
angelbear217
Posted: Nov 10, 2004 09:21 PM+
Posted: Nov 10, 2004 09:21 PM
Re: DIY projects- several ideas
# 5 Tissue PouchesTISSUE POUCHES FOR YOUR GUESTS
Distribute these tissue pouches to your guests before the ceremony for their tears of joy.
To make a pouch, crease an 8 1/2-by-11-inch piece of sturdy yet pliable paper widthwise three times: 2 inches from the top, 5 inches from the top, and 1 inch from the bottom. Fold the first flap back, the second up, and the third down to make a cuff. Center a tissue on the sheet; fold back the sides where the tissue ends; weave the flaps into one another to secure. Turn over the pouch, and insert tissues. Decorate as desired: We stamped each pouch with a phrase and tucked in a phlox blossom.
DebMaher
Posted: Nov 10, 2004 09:22 PM+
Posted: Nov 10, 2004 09:22 PM
Re: DIY projects- several ideas
Lisa:Those are so great. Thanks for posting. Also, Pickles was just looking for instructions on how to make ribbon wands -- perfect timing.
angelbear217
Posted: Nov 10, 2004 09:22 PM+
Posted: Nov 10, 2004 09:22 PM
Re: DIY projects- several ideas
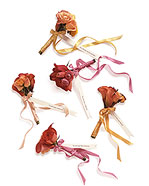
#6 Fortune BouquetsFORTUNE BOUQUETSThe traditional toss bouquet, when caught, tells one lucky receiver little more than that she will be the next to wed. But this distinctive toss bouquet is made up of a cluster of smaller bouquets, each bearing its own secret fortune that offers more detailed information about future husbands to a few agile guests. And for the bride, they form a lush bouquet of blossoms.
To Make:
Separate flowers into small bouquets; you can use one variety or combine several (we used roses, calla lilies, and ranunculuses). Wrap the stems of each bunch with seam binding, securing with a bow; leave ends trailing. Prepare predictions about future husbands— “You will marry the boy next door”; “You will marry your true love”—for the bouquets. Print the fortunes onto a sheet of fine paper, and cut the paper so that each fortune appears on a single strip; finish the ends in an inverted V. Use a straight pin to affix each fortune to its bouquet.
angelbear217
Posted: Nov 10, 2004 09:23 PM+
Posted: Nov 10, 2004 09:23 PM
Re: DIY projects- several ideas
Posted by DebMaher
Lisa:
Those are so great. Thanks for posting. Also, Pickles was just looking for instructions on how to make ribbon wands -- perfect timing.
Glad you like. Let me see what else I have.
angelbear217
Posted: Nov 10, 2004 09:25 PM+
Posted: Nov 10, 2004 09:25 PM
Re: DIY projects- several ideas
#7 Loliipop reLollipop Rehearsal BouquetsSupplies (this is to make one bouquet):
1 5”-6” florists green Styrofoam cone
1 roll of ribbon about 1”” wide
1 package florist corsage pins
several bunches of silk flowers or leaves
1 package lollipops
Directions
1. Begin by turning the cone over so the flat base is down with the tip pointing up. Beginning from about a ½½” from the tip, wrap the ribbon around the cone so the ends over lap. Cut the ribbon and pin it into the styrofoam.
2. Repeat this process until almost the entire cone is covered. Overlap each ribbon slightly. (Because of the angle of the cone, the entire base will not be covered.)
3. Hold the cone by the base and stick the lollipops in the center.
4. Fill in the gaps with the silk flowers and leaves. Cut the length as needed and stick the stems directly into the styrofoam. The lollipops do not ““fill up”” the empty space of the bouquet. Use as much or as little filler as you need. You may need more of the corsage pins to help anchor the filler in place.
alibali
Posted: Nov 10, 2004 10:59 PM+
Posted: Nov 10, 2004 10:59 PM
Re: DIY projects- several ideas
those are such great ideas! i saved a bunch. thanks!


Welcome New Vendors
- The Barn At Old Bethpage Discover the charm a...

- Jack & Rose Jack & Rose Floral D...

- Tellers: An American Chophouse Celebrate Your Love ...

- Cup Of Tea Creative Unique Wedding Gifts...

- Speeches for Milestones The Big Day Has Arri...

- Long Island Bridal Expo Connecting Brides & ...

- 1 More Rep 1 More Rep: Elite Fi...

- Bellport Inn The Bellport Inn –...

- Fiddlers Dream Music Experience the Music...

- Havana Central Celebrate Your Weddi...

- Primerica Nelida Flynn Primerica Nelida Fly...

- Acetra Affairs Here at Acetra Affai...
